From a model driven app (MDA), running a Flow is not as simple as one would expect, particularly on the UI side. It must be apparent to the user. Here are some ways to run a Flow.
- The ‘When a Record is selected’ Trigger and the built in Flow command button.
- A toggle switch on the form to fire the Flow via a DataVerse modified trigger.
- Using the new app editor and command bar to toggle the above switch.
- Using the new app editor and command bar using JavaScript to call an HTTP trigger.
- Using 3 above to load a custom page which can trigger the Flow with user input.
If there are more or better ways, please leave a comment !
(One more sprung to mind, an Action in a business process flow can call an instant Flow, similar to option 1.)
For these examples, I created a simple DataVerse table and form, and set the Boolean Flow Toggle control to be a toggle in the classic editor. The solution containing all of these ideas is linked to at the bottom of this article. It contains:
- A DataVerse table
- A Model Driven App displaying that table
- The Component Library generated by the Command bar
- A custom Page called Dialog
- 2 Cloud Flows triggered by the MDA
- 2 JavaScript web resources.

The form in the app gets some details for an email, and the Flow will send that email.

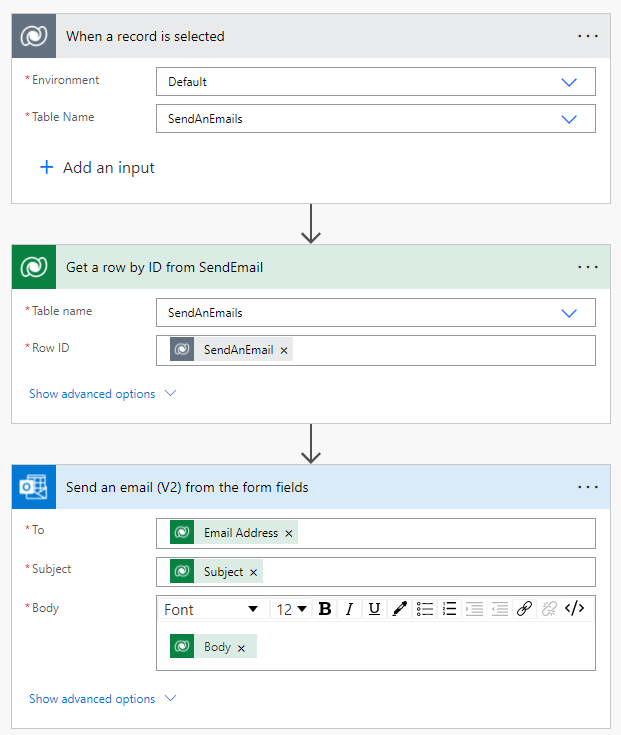
1. Record is Selected
This requires the legacy trigger (Microsoft Dataverse (legacy) – when a row is selected), and then the Flow will show up in the Flow button on the MDA form. (Sometimes it doesn’t …).
Downsides:
- This trigger will surely vanish at some point
- user has to agree to use connections (and see them all)
- lots of clicks and hidden away.
- sometimes the Flows in a solution do not appear in the Flow drop down. The most fool proof way I have found is to initially create a really simple Flow of trigger plus one compose statement. That always seems to show up.

Then the user has to agree to the connections. Not a good UI look.

The Flow below. It’s always advisable to get the full record and not use the trigger outputs. The environment in the trigger to select is Default, which is the current environment.
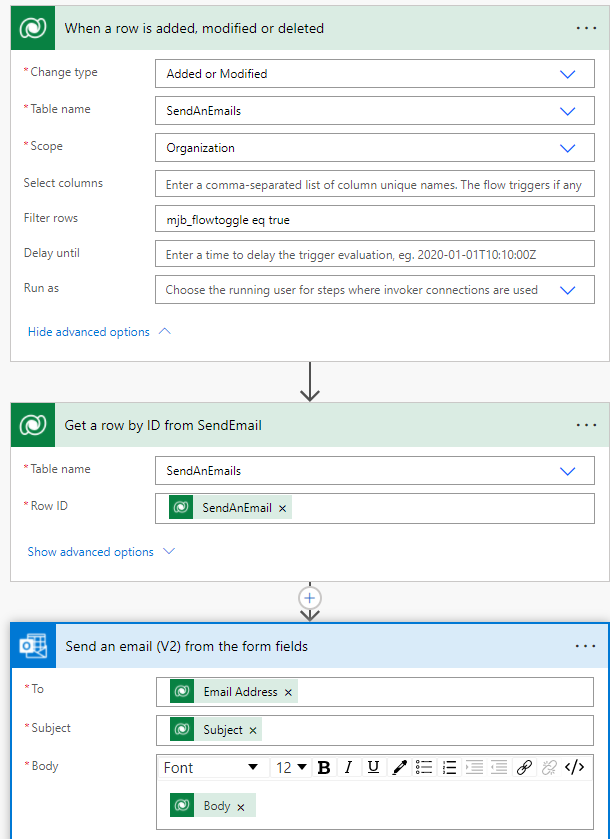
2. Toggle Switch
I prefer this on the UI side. This method has a Boolean field on the table (Flow Toggle mjb_flowtoggle) and form, which is used to run the Flow. It can be combined with business rules to lead the user through the process, by only showing the toggle when other fields are completed for instance.

Downsides: The record has to be saved before the toggle applied (or use javaScript onChange to handle), and another field is required on the table.
The Flow is the same as before but the trigger is now the current DataVerse trigger. (Normally best to reset the toggle back to false at the end of the Flow).
3. New Command bar Editor Button
This will be a different way of clicking the toggle from 2 above, this time using a Command Button as the Click. The toggle on the form would be hidden in this case.

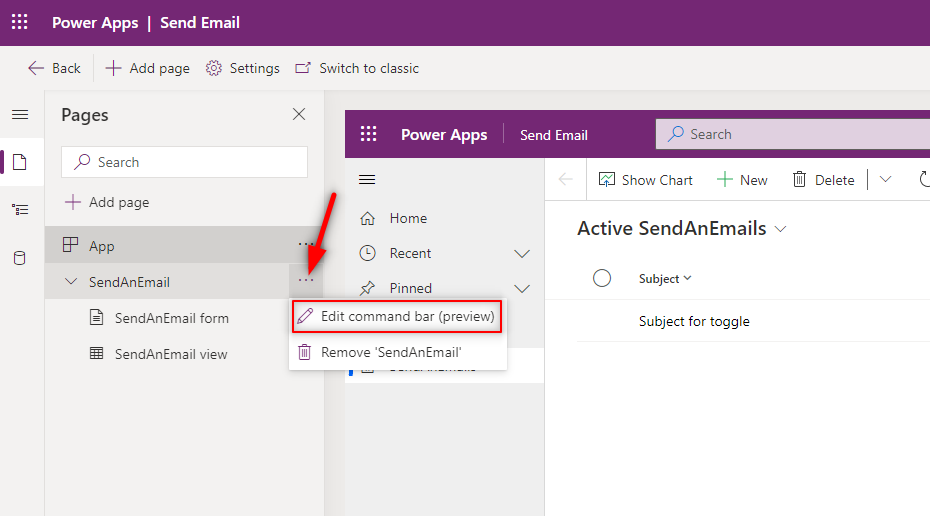
Edit the Model Drive App in the new editor (in preview) mode.

and then select the table and Edit command bar (preview)
and decide where the button should live. The choices are:
- Main grid (the view of the records, useful if the Flow is to run on multiple items at once)
- Main Form (an individual record form) – what will be shown here.
- Subgrid view / Associated View (where the view is embedded elsewhere).
Add a new Command:

and on the right hand pane, edit the command, first with a good name, and a fun icon. The Action towards the bottom is the key part. There are two choices, Run formula or Run JavaScript. Currently, the formula does not let you directly run a Flow like from a canvas app, for example:
FlowInApp.Run(TextInput1.Text)
but this will surely appear at some point as it seems logical.

For now, Patch is usable, so the previous toggle logic can be applied here, to Patch the Boolean value to true which will trigger the same Flow as before. This will toggle the button and save the record. Remember to add error handling into the Patch statement!
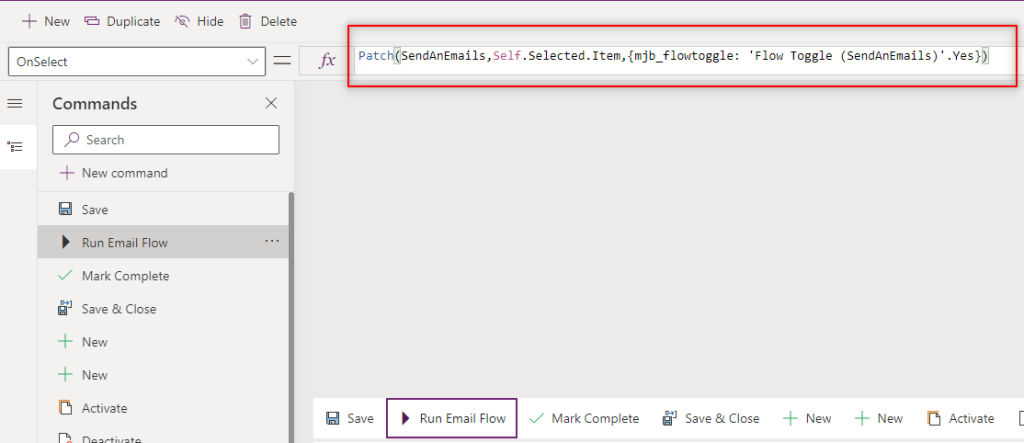
Patch(SendAnEmails,Self.Selected.Item,{mjb_flowtoggle: 'Flow Toggle (SendAnEmails)'.Yes})The button can be named as desired, and if the unwanted buttons are hidden away, makes a better UI experience than the Flow method.
4. New Command bar editor with JavaScript
The trigger to the Flow will now change to the HTTP connector.( When a HTTP request is received). The JSON schema needs to be input. An example is under this image; the Get a Row ID in the following action needs to be pointed at the trigger output.
After saving, the HTTP POST URL will be populated. Copy this, and insert it into the JavaScript file below, in the line let flowUrl = “https://prod-17.uksouth.logic.azure.com:443/workflows……”.

To update the schema, for example, if more parameters have been added, just run the flow from the button, and see the input for the trigger, and paste this into the sample schema to update.
  {
    "type": "object",
    "properties": {
        "flowName": {
            "type": "string"
        },
        "recordID": {
            "type": "string"
        }
    }
}
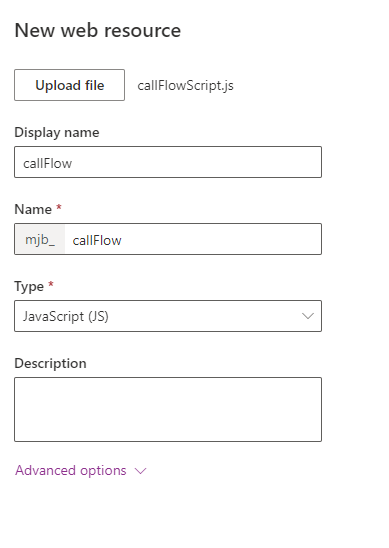
This will require a new web resource of type JavaScript. The function name callFlow is input into the Command bar editor later, and this will be called with the 2 parameters defined there.
The JavaScript defines the Flow to call via the flowUrl variable. and then sets up the input variable as a JSON object. The recordGUID from the app comes wrapped in {} hence the replace function. The XMLHttpRequest is the method to call the Flow via HTTP.
Save this JavaScript to a file first:
function callFlow(flowName,recordGuid){

  let flowUrl = "https://prod-17.uksouth.logic.azure.com:443/workflows......";
  var input = JSON.stringify({
      "recordID": recordGuid.replace("{", "").replace("}", ""),
      "flowName" : flowName
  });

  var req = new XMLHttpRequest();
  req.open("POST", flowUrl, true);
  req.setRequestHeader('Content-Type', 'application/json');
  req.send(input);

  alert("The "+ flowName+" Flow is grinding away");
}
Go into the solution, and add a new web resource, and select this file saved:
Now link this to the command button. Back to the app editor, and select Run JavaScript in the right hand pane, and then +Add Library to add the web resource JavaScript file just uploaded.

Next, add the function name to the right hand pane. From the code snippet above, it is called callFlow, so insert that in the Function name field.
Next, add a parameter or two to give the right context to the Flow. At a minimum, the current record ID needs to be passed, but also strings can be passed in as well. These parameters are passed to the JavaScript function callFlow where they can be used and passed to the Flow.
Below, a string is being passed as well as the FirstPrimaryItemId; this is the selected record GUID.

When the function callFlow(flowName,recordGuid) is called, the string ‘Run Email Flow’ will be in the parameter flowName and the record ID in the recordGUID parameter.
Save and Publish all customisations and Play the app; maybe Refresh the app to be sure it’s the right one!
Hit the button and the Flow will run.

Now the JavaScript can be extended to add more functionality.
For example, get the user who initiated the Flow:
Xrm.Utility.getGlobalContext().userSettings.userId.replace(“{“, “”).replace(“}”, “”);
In the old way of adding JavaScript to model driven apps, there was the option to pass in the execution context, now this is still in the new way, just a bit hidden. It is in fact the same as the Ribbon Toolbox approach, with the same parameters (from Tech World). The parameter to pass context is PrimaryControl.

This will allow greater control with the JavaScript, like using notifications. Back to the command bar editor and add a 3rd parameter PrimaryControl:

The JavaScript web resource needs to be edited for this 3rd parameter. There are now 2 ways to get hold of the field value on the underlying form. Using the formContext or the (deprecated?) way of Xrm.page. Below the emailAddress is being fetched by:
var emailAddress = formContext.getAttribute(“mjb_emailaddress”).getValue();
and a notification sent back to the user with:
formContext.ui.setFormNotification(“The “+ flowName+” Flow is grinding away”, “INFO”);
function callFlow(flowName,recordGuid,context){

  var formContext= context;
  var emailAddress = formContext.getAttribute("mjb_emailaddress").getValue();
  var emailAddressPage = Xrm.Page.getAttribute('mjb_emailaddress').getValue();

  let flowUrl = "https://prod-17.uksouth.logic.azure.com:443/workflows/...";
  var input = JSON.stringify({
      "recordID": recordGuid.replace("{", "").replace("}", ""),
      "flowName" : flowName
  });

  var req = new XMLHttpRequest();
  req.open("POST", flowUrl, true);
  req.setRequestHeader('Content-Type', 'application/json');
  req.send(input);

  formContext.ui.setFormNotification("The "+ flowName+" Flow is grinding away", "INFO");

}
With the formcontext we can add ::
- a check on the email address being blank, if (emailAddress==null){ do something}
- a notification on success or failure; formContext.ui.setFormNotification(“The email address is blank !”, “ERROR”);
- and a switch statement on the Flow being run – this is in case of multiple buttons firing different Flows from one record. One JS file makes more sense !
The final code:
function callFlow(flowName,recordGuid,context){
    switch(flowName) {
    case "Run Email Flow":
        var flowUrl = "https://prod-17.uksouth.logic.azure.com:443/workflows/....";
        break;
    case "Flow2":
        var flowUrl = "https://prod-17.uksouth.logic.azure.com:443/workflows/...";
        break;
    }

    var UserId = Xrm.Utility.getGlobalContext().userSettings.userId.replace("{", "").replace("}", "");
    var formContext= context;
    var emailAddress = formContext.getAttribute("mjb_emailaddress").getValue();

    if (emailAddress==null){
        formContext.ui.setFormNotification("The email address is blank !", "ERROR");
    } else{
        var input = JSON.stringify({
            "recordID": recordGuid.replace("{", "").replace("}", ""),
            "flowName" : flowName,
            "UserID": UserId.replace("{", "").replace("}", "")
        });

        var req = new XMLHttpRequest();
        req.open("POST", flowUrl, true);
        req.setRequestHeader('Content-Type', 'application/json');
        req.send(input);

        formContext.ui.setFormNotification("The "+ flowName+" Flow is grinding away", "INFO");
    }
}
5. Custom Page
The previous version can be turned into a dialog with more control. For example, if the Flow requires values to be entered, they can be handled in the dialog and patched from there before the Flow is run. This could all be done in the JavaScript above, but users do like a good UI.
A new command button will be added to the MDA, calling a new JavaScript file, and a new Page created. Edit the MDA again in preview mode, and click + Add Page, selecting Custom (preview), and on the second dialog choose Create a new custom page and name it Dialog. This will open up the canvas app design screen.

I have uploaded the whole instant Flows solution to GitHub, where the custom page can be taken from (seems that custom pages cannot be downloaded as an .msapp file). The custom page is simple.
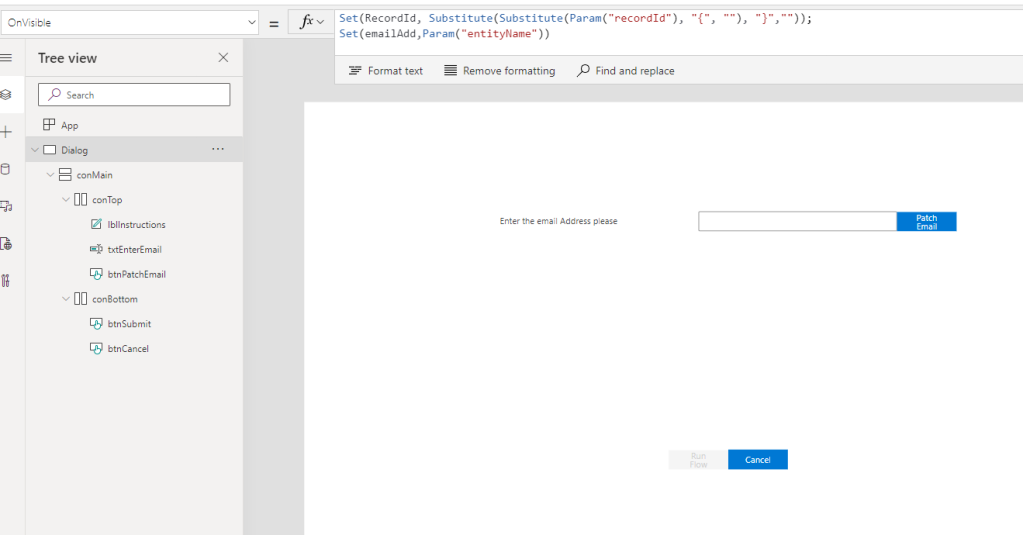
The onVisible takes the 2 parameters passed in from the JavaScript and sets them as variables:
Set(RecordId, Substitute(Substitute(Param(“recordId”), “{“, “”), “}”,””));
Set(emailAdd,Param(“entityName”))
Some control logic on the form then checks if the email address is blank:
If(IsBlank(emailAdd),true,false)
to show the fields to patch the record and disable the Run Flow button. The button to patch the email patches the record and sets the variable emailAdd to display the Run Flow button:
Patch(
    SendAnEmails,
    LookUp(
        SendAnEmails,
        SendAnEmail = GUID(
            Substitute(
                Substitute(
                    Param("recordId"),
                    "{",
                    ""
                ),
                "}",
                ""
            )
        )
    ),
    {'Email Address': txtEnterEmail.Value}
);
Set(
    emailAdd,
    txtEnterEmail.Value
)
The last error does not come back it seems in the custom page, so the normal patch error handling did not work.
The Run Flow button simply calls the Flow passing in the 2 expected parameters and then closing the dialog. (The new notifications table in DataVerse is probably a better way to go now than using setFormNotification, to handle the asynchronous Flow run better. See a notifications example here by David Rivard).
Flowfromcustompage.Run(emailAdd,RecordId);Back()
I created a new Flow called Flow from Custom Page, as before but with a PowerApps trigger this time, passing in two parameters, the email address and the record GUID.

The dialog will be opened via JavaScript. Go back to the command bar editor (preview) in the MDA, and find the form with the earlier buttons. Add a new button as before, with the Action Run JavaScript and a new JavaScript library (Click + Add Library and then + New on the next dialog) . Pass in the Parameter PrimaryControl which is the form context, and the FirstPrimaryItemID which is the record GUID.
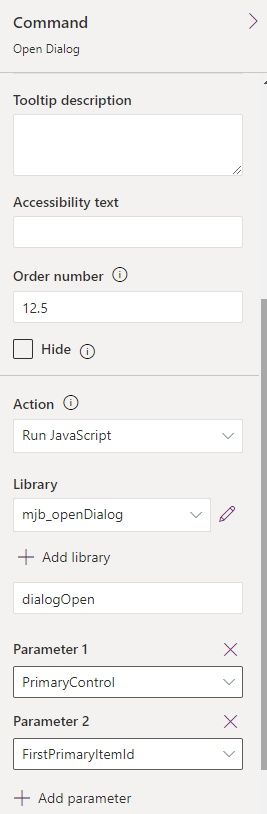
A big issue I found was the custom page caches the record fields, which prevented the dialog running more than once in a session. To get around this, the required fields are fetched in the JavaScript and passed to the custom page.
The JavaScript called by the button is:
function dialogOpen(context,recordGUID){
    var formContext= context;

    var emailAddress = formContext.getAttribute("mjb_emailaddress").getValue();
    // or the old way when there is no context -   var thisRecord = Xrm.Page.data.entity.getId();

    Xrm.Navigation.navigateTo({
        pageType: "custom",
        name: "mjb_dialog_38e40",
        entityName: emailAddress,
        recordId: recordGUID
    }, {
        target:2,
        width: 700,
        height: 400
    })
    .then(console.log)
    .catch(console.error)
}
where the fields are fetched using the form context passed in:
var emailAddress = formContext.getAttribute(“mjb_emailaddress”).getValue();
Note: the same method fails to get the underlying record ID, and returns null which is odd, so this does not work (unless I am missing something):
var thisRecord = formContext.getAttribute(“mjb_sendanemailid”).getValue();
and the navigateTo function opens the dialog custom page. This comes from Diana Birkelbach’s post on custom pages, and the MS documentation on custom pages. The width and height are the sizes of the dialog, which is responsive in this case so looks OK on mobile.
To see the new Custom page after editing, Save and Publish the Custom page, then publish all customizations in the solution, and then clear the apps.powerapps.com cookies in the browser.
Again, the Flow should return a notification to the user when complete, but that’s for another post.
